Sunday, February 27, 2011

A couple more cards and some storage!

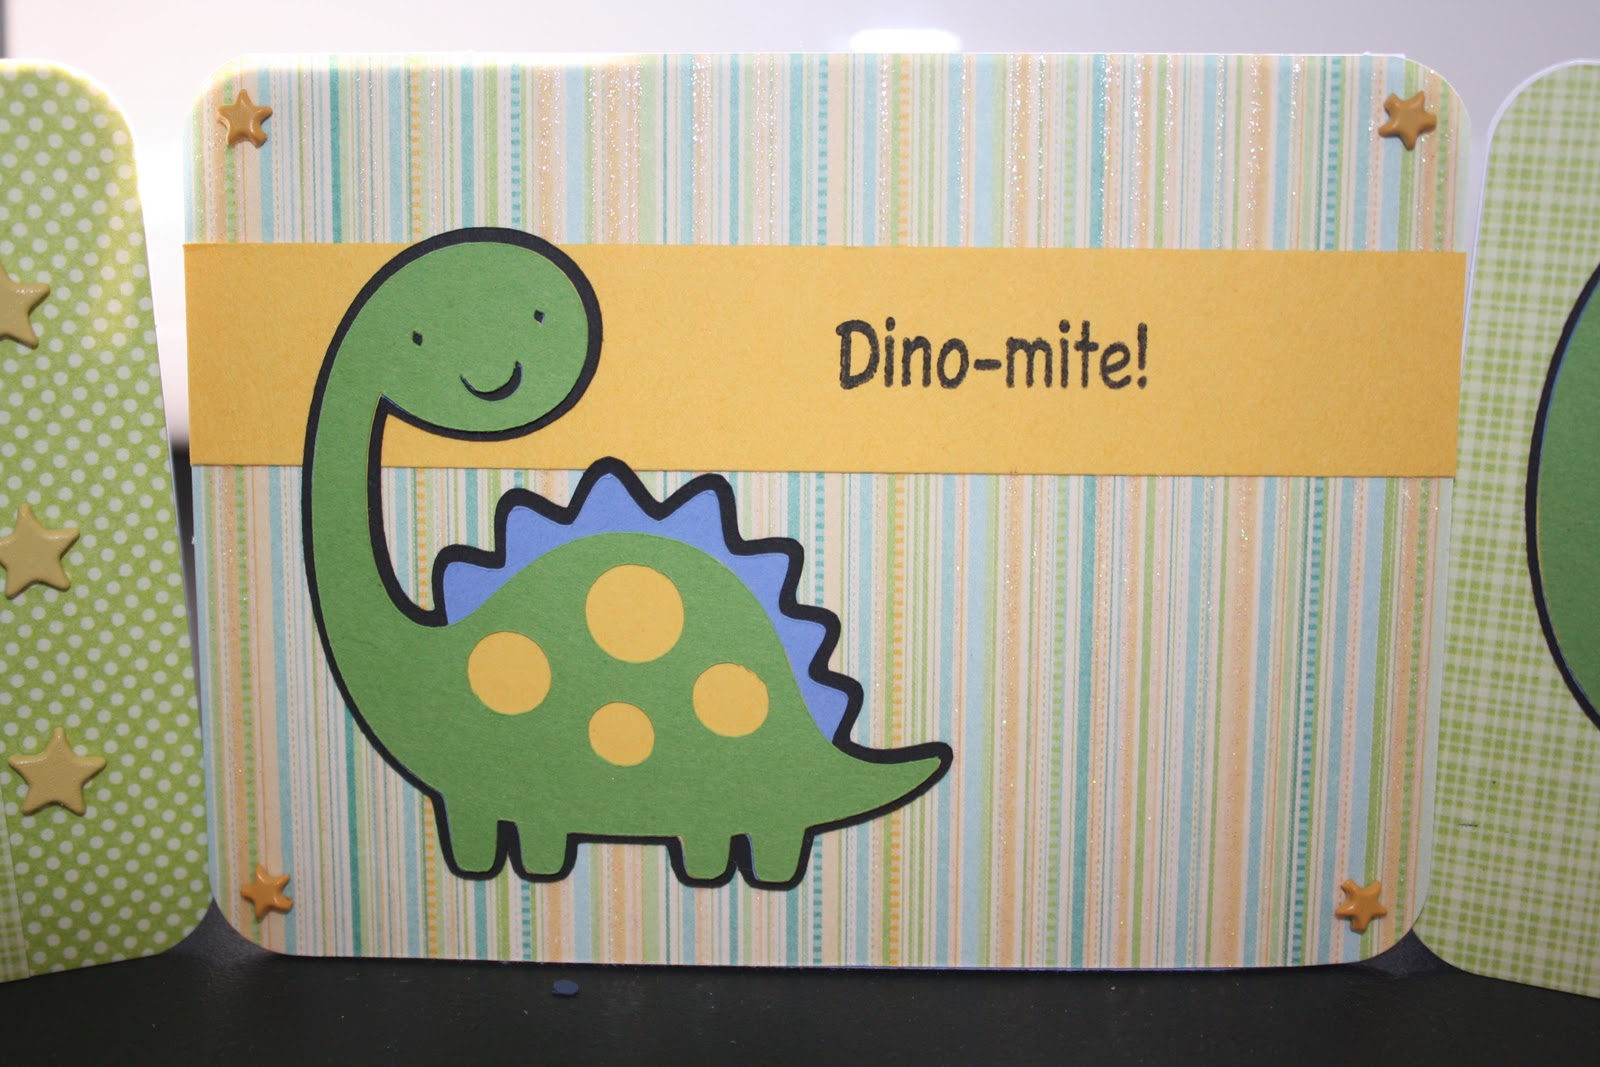
Hey Everyone! So as promised I have a couple more cards made up for you! So let's get right to it!

Again all of these animals were pre-designed on my Gypsy earlier this week, and I cut them out and designed cards for them today! Hope you enjoy!


Layered fish! These were easy and quick to make.


The little "bubbles" are dew drops, and the stamp is from My Pink Stamper.  The card is the basic A2 size and is a pre-made from a DCWV box set. (Check your local craft stores, as they usually go on clearance at the end of every season and I snagged this box of 40 up for only 2.99!)


Next are the owls! There's a cute story behind these guys ... when I was pre-cutting paper for the mats I was having a hard time thinking of what color owls really are, so my husband called a friend of ours son and asked him as he is quite smart.  He gave us the answer and I was on my way.  I crafted with the ladies yesterday and the first thing that my husband asked when I got home is "Where's the owl" so I felt that I had to make them today!


I used the cuttlebug for the embossing of the card and then layered the patterned paper on top to break up the card.  A little bit of Martha Stewart glitter to accent the leaves and that was it! Simple and quick, yet not pink so you could give it to a guy! The stamp is from My Pink Stamper and there is also one that reads You're a hoot! that could be used instead of the one I chose.


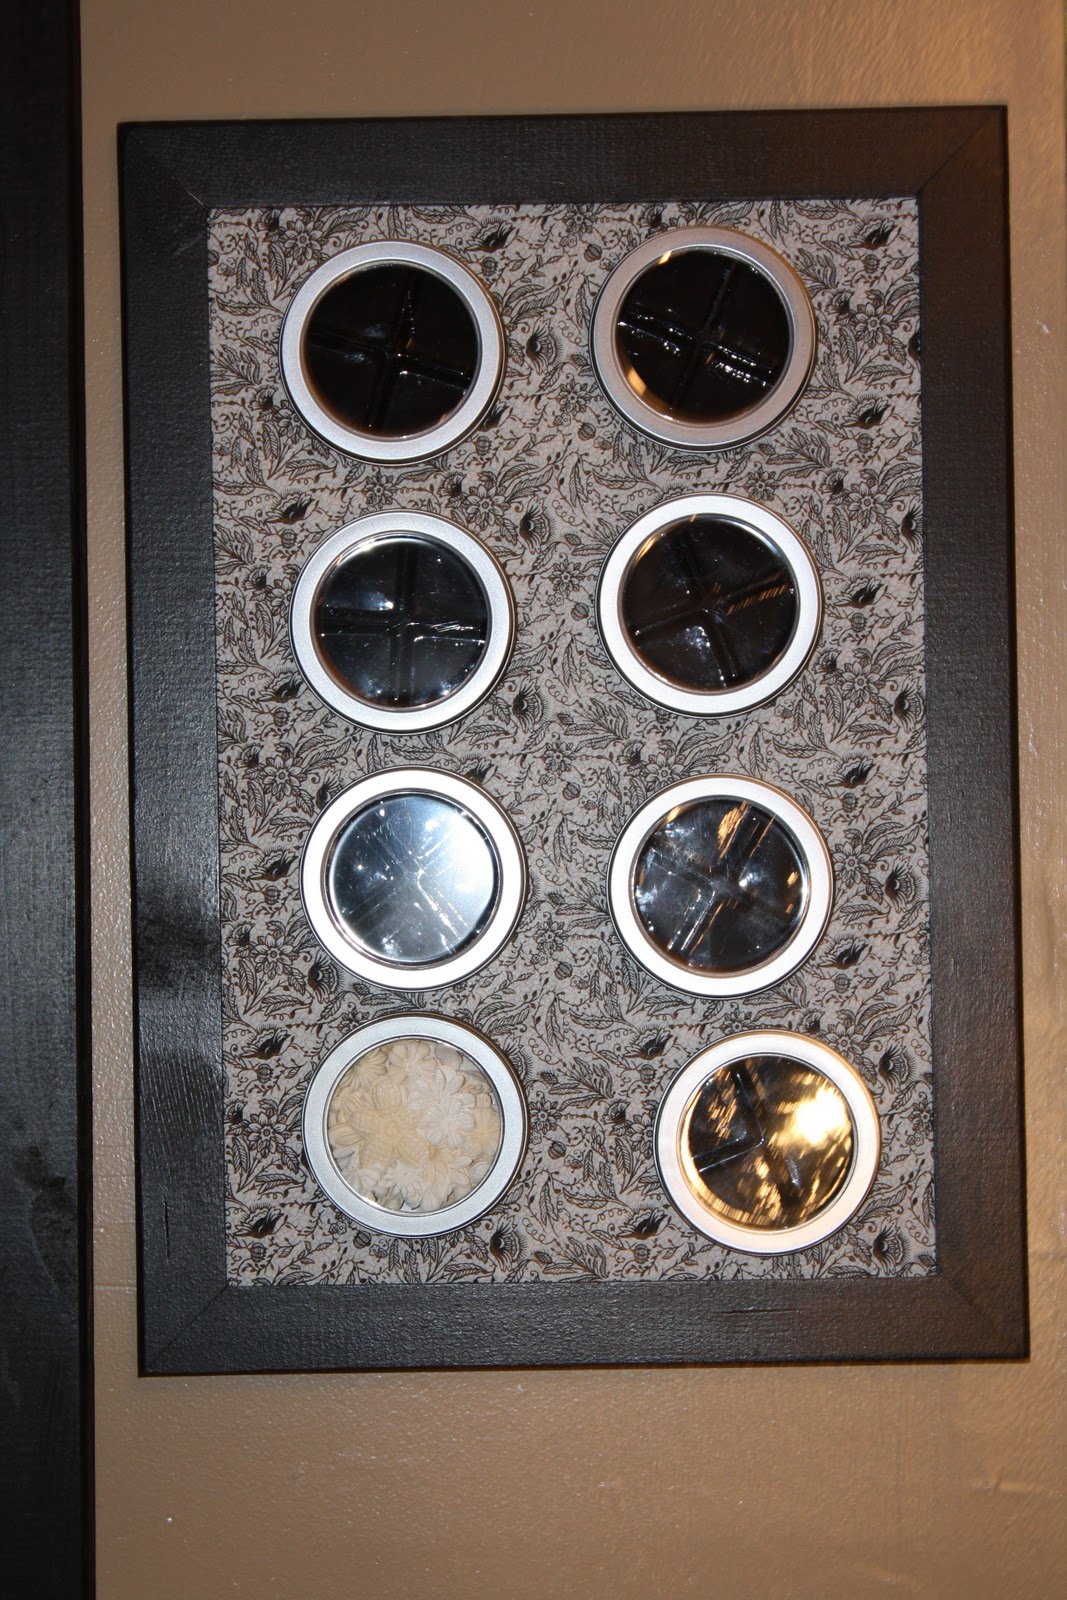
How exciting! Some more of my storage is done! My husband built this and my mom painted most of it.  I touched up the rest this am, and now that it's dry I can start to organize!


I think I need more ribbon space already! I love how I can easily get to all of my things like glitter and some of my embellishments.  I have to think of where to put all my other boxes as they don't fit here, but at least some of my basics are within arms reach while I'm crafting!


The other side!

So with that I'm signing out for the evening! I hope you enjoyed all my projects this weekend! I hope to do some scrapping layouts for you next week, as scrapbooking is my first and true love! I hope you have a crafty week and as always, thanks for visiting Crafting with Meg!

~Meg

Critter Cards

Hey Everyone! I hope that you've all had a great weekend so far ... I'm sad to say that it's Sunday afternoon, but I got some creative time in with my crafty lady friends yesterday.  Anne was nice enough to host us at her lovely home and I think we all got a ton done! Check Anne's debut appearance out HERE as she guest designs at Sue-Ann's Crafts!

So without anymore gabbing, here are some of the projects that I completed this weekend! I was a bit on a roll with the cards, here's what I came up with!


The close up of the Monkey card wouldn't post, but the sentiment says bananas 4 you! I got the great banana paper from MaryAnn as she had a whole stack to do with monkeys!


Next were the skunks ... I struggled a little bit here and I think my issue was the color that I chose to use as the shaddow (blue) I think if I had done a yellow or even pink I would have been more creative with the color options and embellishments, but we learn!


Close up of one of the skunks!


I thought the poodles were too cute! Obviously more of a "girl" card, but I mixed it up a bit by changing the background color of the card on the middle verison. I also changed the layout of the stamp and just put a scrap piece of paper where I didn't want the stamp to hit the card (see blue card).


I didn't realize at the time but the black dotted paper was actually ahdesive backed which made putting all the extra layeres on quick and easy, I might do that on purpose next time!


Finally the dinos! These were so much fun to make.  I changed up the embellishments and color choices just a bit but kept the same dinosaur.


I used my Creative Memories corner punch to give these cards a bit of something different from the others which all had regular square corners.

I used my Gypsy for all of these and saved the animals for future use.  All of the critters were from the fabulous Create a Critter cartridge.  The Gypsy made it easy to make the animals in "bulk" so that multiple cards could be made with ease.  None of the cards have messages inside as I wanted to be able to start "stock piling" cards to have for any occasion, plus once they're made it'll only take a minute to stamp or write in a sentiment to fit the occasion that you're looking for!

Thanks for stopping by Crafting with Meg! I'm back to the craft room to see what else I can whip up for you before the weekend ends!

~Meg


Saturday, February 26, 2011

Guest Designer

Good Morning everyone, and Happy Weekend!

I had fallen so behind on posting when the computer started acting up that I feel like we need to go into overdrive to catch up! So I called in a favor and issued my mom Jo-Ann a challenge (great idea from Sue-Ann).  The weather here was horrible to say the least yesterday.  It was grey all day and kept changing back and forth between snow and rain, both of which were cold and miserable! So what better way to cheer up then to "Think Spring" and so with that here's what my mom Jo-Ann came up with! Hope you enjoy!


Mom's new to the scrapping/cardmaking scene ... only about 2 months! Isn't she creative! She just upgraded from Baby Cricut to the Expression (courtesy of my brother!) a couple days ago, and she's been super excited about it! She even pulled out the flower soft (something I've been nervous to do as of yet, but maybe I'll try it later today)


She even decorated the inside of her card, boarder punch and all!


Then of course on a different note (not yesterday's challenge) I thought I'd feature another card that she made that could be altered for any occasion ....


See the middle? It's a cut open Pepsi can that she ran through her Texture Boutique! (NOTE: The cans can be very sharp, so please take your time and craft carefully!)


She even decorated the inside to cover up the can!


So there you have it! 2 Fabulous designs from my guest designer, my mom! I hope you enjoyed her creativity and that it helps motivate and inspire you today! Stay tuned for more projects as I'm off to meet up with the crafty ladies! As always, thanks for visiting Crafting With Meg!

~Meg


Thursday, February 24, 2011

A Few New Cards!

Just thought that I would catch you up on some of the fun projects I worked on this weekend when the ladies came to the house!


CRABS!

You can easily come up with a great idea for a card and make them multi-purpose.  I made identical cards and changed them up by just changing the stamp! Here's what you'll need!

  • A2 Base (or 4x5.5 inch card when folded)
  • Colored Cardstock
  • Black Ink
  • Sun - designed with gypsy at 1.12 inches from the Doodlecharms Cartridge
  • Crab cut at 2.5 inches from Create a Critter
  • Crab Shadow cut at 2.5 inches from Create a Critter
  • 4in x 1.5in light brown paper cut with wavy blade (I used my Your Story trimmer)
  • 4in x .5in light blue paper cut with wavy trimmer
  • Adhesive
  • My Pink Stamper Punny-licious stamp set for Crab-u-lous stamp
  • My Pink Stamper More Punny-licious stamp set for the Snappy Birthday stamp


Get WHALE Soon!

  • A2 Base (or 4x5.5 inch card when folded)
  • Whale designed with gypsy and cut at 3.12 inches (NOTE cut top and under layer as well as shadow layer - you'll glue together 3 layers total)
  • Ribbon of your choice
  • Adhesive gems
  • Solid Cardstock
  • Patterned Cardstock
  • Black Ink
  • Adhesive
  • My Pink Stamper Punny-licious stamp set


TOAD-ALLY FABULOUS!
  • A2 Base (or 4x5.5 inch card when folded)
  • Ribbon of your choice
  • Patterned Cardstock
  • Solid Cardstock
  • Frog cut from Create a Critter at 3.5 inches (don't forget to cut the shadow as well!)
  • Lilly pad designed with gypsy - patterned paper cut at 3.82 inches
  • Lilly pad designed with gypsy - black paper cut at 4.06 inches
  • Adhesive
  • My Pink Stamper Punny-licious stamp set
These were all super easy to make and I've learned from my friend Sue-Ann when making cards it doesn't take much effort to make multiple, that way I can always have extras on hand to send out or give at the last minute!

Thanks for stopping by Crafting with Meg!

~Meg

Some Scrappy Storage!

Ok! So as promised I have a couple pictures of some great things my husband has put together for me for my scrap room!


Above is a 1ft x 6ft peg board that he framed out and routered (very nicely I might add!) I got hooks from our local Home Depot and used this to store some stamps, un-opened chip board, and other items.


This one is my pride and joy! My husband says it reminds him of a store! It is a 3ft x 6ft peg board, framed and routered the same.  I can't believe how much MORE PRODUCTIVE I have been since putting this big guy up! I get so many great embellishments on sale and for specific projects and then can NEVER find them when I need them! This is already paid off as I've been using them now that I can FIND THEM!


Finally, is my magnet board! We picked up a piece of sheet metal (again at Home Depot, do you sense a theme here!?) I got some fabric from JoAnn Fabrics crafts store and hot glued it to the back with the amazing 3M glue gun that my dad gave me! Jon finished it up by framing it out.

All of the items were pained with Behr paint in a black semi-gloss, this allows for it to easily be washed down while you're cleaning without taking the paint off!

We currently have a long shelf/ribbon holder ready to be pained, as well as some cubes and storage shelves that just need their final sand and then painting! The final additions to the room will be my cabinets and counter/workstations that Jon promises to build next!

I hope this gives you some ideas on easy storage that can be adjusted to fit any space! Thanks for stopping by Crafting with Meg!

~Meg

And I'm back!

Hey everyone! I've missed you! We had some serious computer issues in my household and just got the little stinker back today ... so I'm all hooked up and things are looking good! I had a fabulous weekend, my husband slaved away building things for my scrap room! and I got to craft with my mom (who we just sucked into scrapping and card making!) my friend Becca and Sue-Ann from Sue-Ann's Crafts!  I've got lots of great things to show you, but first I must finish some laundry and take some pictures! I'll be back soon with some of the great things my husband has built me and some of the projects we got done this weekend!

~Meg

Tuesday, February 15, 2011

A quick card!

Good Morning! Blogspot is pretending to like me this am so I figured I better pop up some pictures now before it changes it's mind! This weekend I crafted with some great ladies and wasn't in the mood, so I made cards and my Valentine treat boxes that I posted on the previous blog! This is one of the cards that I ended up making.  VERY quick and simple but the sentiment says it all!


The stamp is from Robyn over at My Pink Stamper and is perfect for this simple card!


The trick to black cards is to make sure you have something to write on in the inside ... I've done colored gel pens before to try to write on black and I smudge them ... everytime, so I used a Fiskers border punch to make a decorative insert to write on! The card size is the normal A2 and the minimal detail on the front will allow for normal postage (Remember when you  start to use square cards or those with extra embellishments the cost to send will go up because your local post office will have to hand process them!)

I hope everyone has a great day, and as always thanks for stopping by and following Crafting with Meg!

-Meg

My Pink Stamper Blog Hop Challenge!

Hey everyone! Robyn over at My Pink Stamper hosted a blog hop (along with her design team) this past Friday night! I can't tell you what the challenge was, but I can say that it was fun! Below is my entry!


Quick how to ...

  • Box cut at 4 inches from the Tags, Bags, Boxes and More Cricut Cartridge
  • Paper of your choice
  • Adhesive
  • Ribbon
  • 3 inch x 10 inch plastic bags (purchased at Party Wharehouse - 100 per package was 2.99)
  • Stamps of your choice
  • Stayz On (Ink that you can use on plastic!)
  • Ribbon
  • Gel pens - Black and white
  • Chocolate!
  • Creative Memories round punch
  • My Pink Stamper Lovea-licious Stamp set
This project can be adapted for any holiday, just change the colors of your cardstock and choice of stamp!

Hope you enjoyed my entry, have a Fabulous Valentine's Day!

Monday, February 14, 2011

It's been busy around here!

Hey Everyone!

I hope everyone had a great weekend! There's been alot going on in my household! Last weekend was my mom's birthday, and dad's is today so there hasn't been much time for crafting, but I can't leave you with nothing! My wonderful husband has been working away all day in the basement building the things that we both think will make my scraproom very functional and fun! Of course I'm doing my part ... well sorta! We were at Home Depot at 9am! I've been up in the room re-organizing and getting things ready for the big re-do!

I've been organizing my ribbon and flowers, yes sounds silly, but at this point ... the room is a bomb, and it's so hard to find things I'm finding that I'm not as productive as I'd like to be! So organize we shall!


I took direction from my friend Sue-Ann and got rid of old ribbon spools that had only a little left and rolled them up and placed them in some old Yankee Candle jars! Then put all the rest in one spot so that my husband could see how large my ribbon section had to be when he built that part of my new craft room!


I got some new flowers at Michael's on Friday night ... I picked ou the blue and my husband who is amazing took the other 3 colors off the hook and bought those for me too! I secretly think he's planning on buying a new tool so he's making sure I don't notice!

Just a quick look at some of the things going on around here! Look for my MPS challenge post that I'll throw up soon! Have a great day!

Meg

Sunday, February 13, 2011

Problems with Posting!

Hey everyone!

I'm sorry to report that I'm having issues on the Crafting with Meg blog! =( So Sad! I've got a couple great projects to share with you that I can't get pictures up of! I'm going to give the site a while to rest and then try back again! Thanks for hanging in there and I can't wait to show you some of the new stuff that's going on here!

Meg

Wednesday, February 9, 2011

Yay they're in!

It seems like it took FOREVER, but the My Pink Stamper stamps that Sue-Ann and I ordered are FINALLY here!

This one is the Punny-licious ...


And this the the More Punny-licious!


Sorry for the glare, but without the flash the picture just wasn't happening! Remember to check out the My Pink Stamper website to get your own! I've got big plans for these this weekend, so stay tuned for new posts! Have a great night!

~Meg

My Pink Stamper Challenge!

Good Morning Everyone!

I was a little worried that I wouldn't find time to enter this challenge, but I did! Here is my entry for the My Pink Stamper Challenge which you can take a look at HERE.


Now I can't tell you exactly what the challenge was, you'll have to hop on over to Robyn's page and check it out! But in the meantime, here's what you'll need for this one!

  • 2.5 inch tree cut from Cricut's April Showers Cartridge.  Feel free to use any colors you'd like, I went with the typical green and brown
  • Recollections pre-made card base, measuring 4 x 5.5
  • Patterned Paper measuring 4 x 5.5 from the DCWV Citrus Mat Stack
  • Yellow patterened paper measuring 1.75 x 4 also from the DCWV Citrus Mat Stack
  • Yellow patterened paper measuring 2.75 x 1.75 (just some of the leftover from the last cut!)
  • Cloud 9 Stamp set
  • Tattered Angles glitter mist in Silver
  • Yellow Ribbon
  • Adhesive
  1. Make the cuts on your cricut of the tree from the April Showers Cartridge
  2. I stamped the sentiment on the 1.75 x 4 piece of yellow paper first, as I'm not always so good at it before securing it to the card front so that if I make a mistake I don't have to take my card apart.
  3. Secure patterened 4 x 5.5 patterned paper to the front of the pre-made card
  4. Secure stamped yellow cardstock wherever you'd like on the card.  I chose the top, but you could always put it on the bottom as well!
  5. Use yellow ribbon (or any color of your choice) to finish off the edges of the stamped cardstock.
  6. Spritz the green base of the tree with the Tattered Angles and let dry.
  7. Glue brown tree trunk to base of tree.
  8. Adhere tree to yellow paper measuring 2.75 zx 1.75 ( I then used my corner rounder to give it a more finished look)
  9. Adhere the tree to the top or bottom of your card depending on where you placed the sentiment!
  10. Finally, send this card to someone who has been there for great memories in your life!
That's it! Simple and quick and bound to make the person you send it to smile!

I'm hoping to get much crafting done as I meet up with Sue-Ann and a few of our very crafty lady friends! I'll be sure to share some of my newest creations! Have a great day!

Wednesday, February 2, 2011

Inspiration Station Challenges part 2!

Back at it! This was the 11am challenge ... the Vacation one! This was from our trip to Mexico in May 2010! I hadn't flown in years and was quite nervous! But no worries, Jon made me laugh the whole time! The Cricut 50 States Cartridge came in handy here!


 The next Challenge was the 12pm ... and just in time for lunch, the challenge was something to do with food!  This was from the BBQ for the troops in 2008! It was the first year we held it and was such a success that we've been doing it every year since, and now we're hoping year 4 will be the biggest yet!


The 1pm challenge was to make something having to do with friends or friendship.  I decided a cute little animal from the Cricut Create a Critter Cartrdige would would out well.  If you press the phrase button it gives a ton of great little add ons for any project, that's where I got the word "friends"


Ok, that's it for now, they posted the 2pm challenge and as you can tell, I'm behind! See you all soon!

The Inspiration Station's hourly challenges!

So far this am there have been 2 challenges from the Inspiration Station, so as I'm sure you can guess that Sue-Ann and I have been crafting away this gross icy morning! The first challenge was to create something having to do with spring or flowers, so thinking that I only had until 10am (as this was the 9am challenge) I high tailed it and created this cute little card using the new April Showers Cricut cartridge!


I then learned that there was no time limit ha ha! The 10am challenge was to making something with glitter or glitz! So seeing good ole' dad is a rock star, I decided what better time to start the book I want to make with pictures of his band then now?! The music notes came from the Designer's Calander cricut cartridge using the events key on shift.


The 11am challenge was just posted and now it's on the theme of "Calgone take me away", so a vacation project or page ... I'm thinking my trip to Mexico last year will be perfect! Be back in a bit!

It just keeps falling!

Good Morning! Here in good ole' New England we didn't get as much snow as they originally thought before it turned to sleet and freezing rain (which is now set to last all day). They're even predicting more snow on Saturday 4-6 inches, and another big storm next Tuesday! I don't know where we're going to put it! So one of the scrap stores we go to is hosting an "online crop" where all the contests will be submitted online to win prizes ... hopefully there's one I can take part in! Check out The Inspiration Station on Facebook to take part yourself! I'll try to whip up some crafty ideas to share with you throughout the day! (I was hoping my JoAnn Fabrics online order would be in as I have a great idea for some of the stuff but I'm thinking the weather may have slowed that down a bit!) Have a scrappy day!

Tuesday, February 1, 2011

Thanks SNOW Much!


So as promised here's a quick craft for you tonight! Below is a picture from out my front door! Like I said before, about 8 inches of snow today and we're only expecting more! Perfect night to craft!


We have a nice neighbor who keeps snowblowing our front walkway while we're at work before we get home, so I thought a Thank you card was in order.  Here's what I used!

  • Cricut Winter Lace cartridge
  • Colored cardstock of your choice
  • Zig 2 way glue pen
  • Black fine tip pen
  • Brads
  • Assorted Ribbon
  • Glue Dots
  • Adhesive pop dots
  • Black stamp pad
  • Studio G clear stamps
  • DCWV "The Winter Combo" Box of cards (size A2) Keep an eye out at your local craft store (usually JoAnn Fabrics, I got this box of 40 for only 2.99 with the envelopes included!)


I started out by using my Gypsy to cut out my snowflakes from the Winter Lace cartridge.  This is a basic cut and you can easily do it on your cricut without the Gypsy in no time! I cut the blue snowflake and it's background version at 3 inches.  I then went back and cut the background again in black at 3.5 inches so that the snowflake would stand out.


Next I used glue dots to secure ribbon down the right side of the card.  You can use as many as you'd like and layer them to match the color of your card background.


Then I put together the snowflake.  I used the zig 2 way glue pen to glue all 3 pieces of the snowflake together.  Once complete I poked a hole in the middle to allow the brad to easily go into the middle without ripping the snowflake.


Next I used the adhesive pop dots to give the card some dimension.  Then you can place the snowflake wherever you would like on the front of the card.


Then I added a piece of white paper, framed out in black to make it stand out with the words "Thanks SNOW much" like the pun?! and fastened that to the front of the card as well.


Then I decided that the project needed a little something extra.  I got out my Studio G clear stamps and stamped a snowflake in the bottom right corner of the envelope to finish off the project.  I can usually find these really cheap at your local craft store.  They generally run about 1$ but I tend to buy these at the end of the season and only end up paying 50 cents or so!


So there you have it! Our finished project! I'm going to have my husband pop it in the neighbors mailbox tonight when he finishes cleaning up outside the house!


Hope you enjoyed this quick little project! Stay warm!

~M

More snow?!

Well in New England we have a saying, "If you don't like the weather, just wait a minute, it's bound to change!" In our case ... not so much! We had a bit of a snow storm today, maybe about 7 or 8 inches and we're getting ready for another 12 tomorrow topped with up to an inch of ice.  My job NEVER closes, but we were lucky enough to receive an e-mail not long ago saying that we did not have to come in tomorrow! Great news! So seeing that I worked all day today I've gotten plenty of work done so now it's time to craft! Stay tuned for a couple of projects, and if you have to be out in this gross weather, drive safe!